Wednesday, 10 April 2013

Building a two storey ruin building and industrial silo

Over the weekend I decided to recycle some of the cardboard and junk lying around the house. I have this bad habit of collecting cardboard if I think I can make something out of it.


But after bringing it home, it's usually "chucked" aside for the so called “future projects” pile. It’s a sign that I am becoming a “hoarder”! Yikes! Better do something about it soon before I start hoarding each and every cardboard I lay my hands on!

Below are some of the 40k scenery I have been working on; 2 two-storey buildings and an industrial silo. I have decided to use a different base in lieu of the mdf bases which is my usual MO. Instead, I have started using art canvas which I have recently discovered in my local stationary shop. Surprisingly durable, and somewhat lighter as well. 

The buildings are built out of foam board and cardboard finishing for cornices and parapet tops. Roof’s made out of corrugated cardboard.


The industrial silo was actually made from a polystyrene piece from my new microwave box and a large metal tin which had some preserved fruit, which I had for desert the other night. And of course some cardboard takeaway box (yes my unofficial sponsor ). To finish uo I added some bendy plastic sipping straws and some foam board to the sides to create some steps.


Took me another week but I finally finished basing and painting the terrain pieces.
All the terrain textured and finished with sand with PVA glue before painting.

And here are the finished product.


As always, good luck in your scratch building
Capt. Stainguard


Tuesday, 5 March 2013

Converting your Steel Legion Troops

I did say in my earlier post that I have made some weird and wacky conversions of my own over the years to expand my Steel Legion miniature range. 

So without further a due, here are some of my Steel Legion trooper conversions.

Let me just say first off, converting metal steel legion miniatures can be a real pain! (don’t really like cutting metal mini’s) Most of my conversions are basically assembling plastic with metal.

sergeant, missile launcher trooper and reloading lasgun clip trooper


The best models to use are the sergeant body and the trooper who is pulling something from his pouches and the missile launcher mini. 
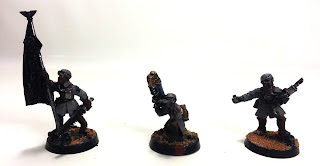
Converted flag bearer, kneeling plasma gunner and trooper lobbing grenade


This is because the arms are loose and you can fit them with any arm to suit, or the arms are easy to remove. Unfortunately for the ease of conversion, you will have to buy lots of the sergeant bodies for your conversions, which is why I like the trooper conversion best.


Steel Legion Flamer Trooper

 
The flamer was one of my first conversions. My opinion, the best arsenal in the guard army, which the steel legion range is lacking! Pretty standard muzzle cut off replace with flamer muzzle and a small tank attached to the back of trooper from the old tank accessory spru and a piece of wire.


The rest were basically the same but I vary some with just having the smaller canister from the flamer spru straight from the plastic Catachan range glued under the magazine clip of the lasguns.


One of the most recent and ambitious conversions, is to fit the plastic Cadian flamer weapon to a steel legion trooper. This requires lots of precision and careful cutting to remove the lasgun. Once removed, you might need to chip the sides a bit more to fit the flamer into the trooper’s hand


The flamer too, will need to be cut to suit the hand. The final thing is to add the promethium tanks behind the trooper. You might need to cut/shave a little of the back of the trooper to get a nice flat surface to glue the tanks to the back of the body.
  
Putting the tanks and the flamer component together with the metal trooper is fiddly but not impossible. Believe me it’s worth the effort! And there you go; a steel legion flamer trooper. 


Steel Legion Plasma Gunners
 
The models used for these troops are the kneeling missile launcher trooper and the leaning forward trooper. The missile launcher fella is easy to convert as it only take a hand swap and adding some binoculars on the other hand. The second conversion is a little more challenging as it requires you to remove the entire lasgun barrel on the trooper before adding the plastic plasma gun (this one took me a long time to do!).


Steel Legion Meltagunners


Meltaguns are also difficult to convert if you are using any of the generic steel trooper with a lasgun. My initial meltagun conversions are basic the removal of the lasgun muzzle replaced with a meltagun barrel at the front. I tend to cut out the plastic meltagun power coupling from the side and glue it on to the lasgun as well. 

Not my best conversion but the thought of removing another lasgun from the metal mini’s makes this conversion fairly simple.


<To be continued>


As always good luck in your scratch building
Capt. Stainguard

Thursday, 28 February 2013

40k Communications bunker


For a bit of nostalgia, I have decided to try my hand at a 40k Communications bunker over the weekend.


It was first featured as a terrain project in a web magazine by Games workshop USA called Black Gobbo (I miss that site!).  Needless to say I managed to track down the site through the "wayback machine" internet archive, link below:-  


Sadly to say most of the links are broken and the templates are no longer available.
I managed to find one or two images using the wayback machine site to get a rough idea of how to build this piece of terrain. Some of the instructions are still available within the site (link above) but most of the pictures are missing. So using any available pictures I can find and the instruction in the site as my guide, I started to build the bunker.
Refer orriginal picture


First I cut four walls (roughly 5" x 5") out of a 5mm thick foam board. Next task is to cut the buttress elements and door components. Then on all four of the walls, I cut a 45 degree angle technique on the sides. This is to allow the walls, when fixed together to “butt up” against one another.
 

I then cut some groves into to of the side walls for where the buttress would go in. The buttresses are cut out of thick 2 ply cardboard. It was such a chore to cut the buttresses, so I cheated by cutting less then needed. (I know the original instruction uses plastic card, but I like using card board and it’s cheaper as well!)


After attaching the buttresses, I fixed three out of four walls together with PVA glue. In order to make the roof of the building I measured the opening at the top and cut out a foam board to suit. The roof itself is held up by some extra pieces of foam board within the bunker. I only then glued the last wall to the rest after fixing the roof.


I then proceeded to cut out 4 pieces of cardboard which will be used to cover the corners of the bunker. Later I also cut out some strips of cardboard as surround piece to wrap around the top. I then glue them to the bunker as shown in picture below. 

 
The top parapet wall was a little tricky as again I had to measure to suit and cut out the angles to have the whole parapet to mitre against one and other in a 45 degree angle. For this I used a thicker cardboard about 2ply. To finish off I glued the doors and buttresses to the side(yes i know i have been supporting a particular fast food chain during my scratch building projects; just to show any cardboard will do and I do recycle all the time! :P) .


All you need is to paint, and it's finish. I actually used a Dulux branded paint "grey with texture". 
You can add other 40k icons eg the imperial eagle or chaos icons to finish off, but that is up to your own creative taste. 


You can also use this as a bastion to your 40k games and add weapons to this piece of terrain as shown in picture above.


As always, good luck in your scratch building
Capt. Stainguard


Sunday, 3 February 2013

Scratch building 40k Barricades


I  have decided to kick-start the year by making some terrain. The first thing that caught my eye was the wooden rulers for sale at the departmental stores (eg k-mart or Office works here in Australia) for school kids at the start of school season. 

One of my basic rules for scratch building terrain; base your terrain/scenery on a solid base. This is a no brainier because your terrain will last longer. So Wooden rulers, make good bases for barricades.

What you need
Utility knife
Metal Ruler
PVA glue

Materials
Wooden ruler
Bits of foam board
Corrugated cardboard
Sand/flock
Citadel paints

Instructions
I cut the rulers in half (I bought the 30mm ones) with a utility knife. You can choose to cut the sides to give it a less squarish look if you wish.


The next step is to cut some foam board and stick it to the wooden base using PVA glue. Fortunately for me I have lots of left overs from previous projects. I prefer to have the foam board glued on in bits (just enough to cover your models) to represent rubble so you get that ruin city look.


Cut some corrugated card board. You can purchase this in any stationary store (or get them from takeaway pizza boxes). Cut them into triangles and stick them behind the foam board walls. This will act as roof sheeting debris or just bit of metal fencing being propped together in a warzone.


Now using a wet brush evenly spread some PVA glue to the surface of the base.
Not my favourite part because it can get messy. Quickly after this process, add sand (or flock) and leave to dry. Make sure the PVA is dried before proceeding to make sure the sand is sealed in!


Now you are almost done. Base coat the terrain with chaos black (I sometimes tend to add a light wash of PVA glue and water just to seal in the sand before base coating).
I used a dry brush technique to paint my terrain. I started painting the base, first with snake bite leather (or scorch brown).


The exposed foam board is dry brush painted with codex grey. I then painted the corrugated board with brazen brass. Finally paint boltgun metal over the top bits of the corrugated board.


There you have it, some 40k barricades!


I would like to encourage you to give this a try but if this is too time consuming and messy for you, I have some on ebay for you to bid, just to save you the trouble.


As always, good luck in your scratch building
Capt. Stainguard

Saturday, 8 December 2012

40k Apocalypse 2012

With Christmas almost upon us and some people saying that the end of the world is near,  I figure it’s only fair I  post a picture of an apocalypse game, which I had the privilege in participating a couple of years ago in a local gaming club called “Armadale Wargames” which runs almost every year now (near Christmas time), an annual apocalypse tournament since 40k Apocalypse was introduced.  


This also brings to mind my very first vehicle conversion when White dwarf promoted the Vehicle Design Rules. I had the inspiration to build this monstrosity after reading one of the Gaunts Ghost novels which featured a traitor guard warmachine. Unfortunately as time passes by, I tore the model apart for parts since most of my friends were afraid to go up against it and there wasn’t much use for this model in a standard 40k game. So parts were recycled and made into other things. But today with the introduction of 40k apocalypse, I wondered how this model would have fared? 


Lucky for me I took a picture of this conversion before disassembling it in the chop-shop :P


Merry Christmas!
Capt. Stainguard