Tuesday 14 June 2016

Scratch Build Thunder bolt


A few days ago I met up with a friend and we started talking 30k. If I were to play 30k, I will finally have a chance to use my scratch built Thunderbolts.  Using the Solar Auxilia list, the Thunderbolts will fit nicely in the fast attack slot. Building the Solar Auxilia will be a whole different story but for now, let’s go down memory lane on how I made these fellas.
Now I built these flyers a few years back and I have only used them 4 times. Fortunately I did take some pictures when I was building them and they were mainly built like my Hell Talons Flyers - out of card board.

I used a template I found in the net but did some off my own modification. I wanted some uniqueness to the flyers so instead of following the usually wing shape, I change them to the classic v shape to mimic the forgeworld mk1 lighting flyer (yeah they don’t sell that model anymore)

I did not go for the bending straws this time for the engine bit (the inter cooler system), but instead  I decided to use reticulation sprinkler heads which kinda pimped the engine a little. It reminds me off an injector system on a V8 motor car. Nice!

The thunderbolt primarily uses twin linked autocannons as its main weapon, so instead of using the imperial guard heavy weapons spru, I opted for the autocannon from the chaos defiler kit which looks nice with the gun-belt look, feeding from the ship. The turbines are from the space marine drop pods (yeah it was hard to source these parts as I went ebay for some)

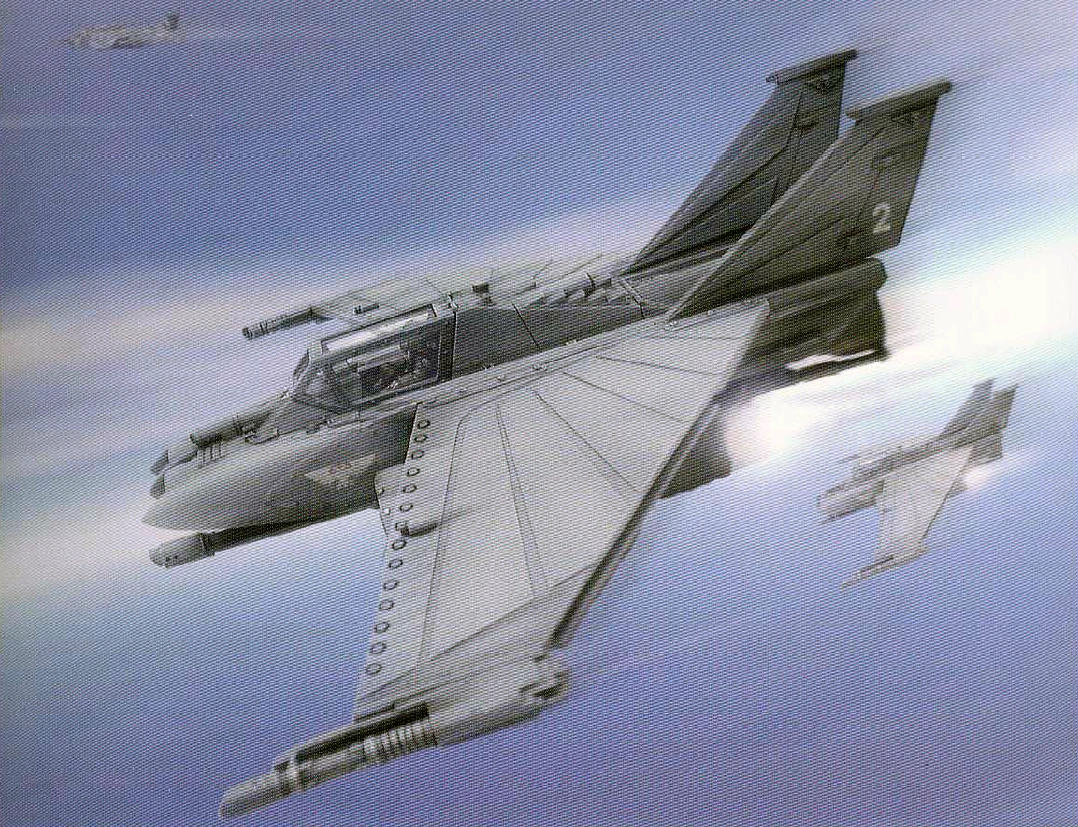
After basecoating the miniature in chaos black, it finally looks like a decent flyer. I hastily painted the entire ship in codex grey and behold, a scratch built thunderbolt. And yes, I made two at the same time.

Here is a comparison between the real Macoy and the scratch built Thunderbolt which I will dub the MKXT Thunderbolt, which is probably a forgeworld planet prototype of somekind…lol.

Friday 3 June 2016

40k scratch built Warhound


One of the many projects that I hesitate to do is a scratch built Warhound.


A few years back I actually took the plunge and decided to build one so I can take it to an apocalypse game. Nothing motivates me more then to have a big piece of cheese spewing death and destruction on the battle field.


Unfortunately I never did take it to the game as my team decided to do an infantry list at the very last minute with hordes of vendettas. Those bloody movie marines nearly got us that time…ahhh good times.


So anyway, I didn’t really took many progress shots at the time but here are some work in progress shots for all who are interested to make one for themselves.


I am sure if you just goggle "warhound titan templates", you might still find some floating around. I hope some of these pictures might serve to inspire others to attempt this fun project.


This project is currently on hold and is basecoated  black at the moment. If time permits, I will have this painted one day.

Friday 6 December 2013

Space marine corpse’s scenery


Came across some really over painted and badly converted space marines in a garage sale which I got for a cheap deal. Not sure why I bought them, but it must be because it was lumped in a bundle of other cool stuff as well.  Looking at the space marines gave me an idea of a scenery conversion of some dead marines as terrain piece.


This time I used a 2mm thick mdf elliptical door sign as a base. I covered the hole with some card and proceeded to add some foam board pieces and other extra plastic bits. I then had fun cutting up the marines specifically at their leg joints and arm joint to repose them. The idea was to have them looking face down of sitting up against a wall with severed body parts.


Plus I drilled some bullet holes in the bodies though the desired effect was a little subtle then I have expected. To finish off, I textured the entire scenery with sand. The scenery was then basecoated  in black and I started painting “ultramarine blue” to my dead smurfy marines which came out quite nicely against the dark backdrop. 


I think this terrain is quite simple yet effective piece. A close up below to all the plastic bits after some dry brushing of “codex grey” and highlights of “boltgun metal“


 Here is the final product below


I decided to do a second one on a round base just for fun. Enjoy.


As always, Scratch building is fun and rewarding. Give it a go!

Capt. Stainguard


Monday 23 September 2013

Build a 40k dice tower


Trolling through the net for ideas, I came across a dice tower. After being fascinated by how it works, I realized this is probably something I could do as well. I drew a sketch to get my mind in motion.

After scouring my table for materials, I have decided to make one out of 5mm foam board and card board. This piece will work as a dice tower and doubling as scenery for the table top.

 
I started with the basics to determine how tall I wanted this tower to be. I decided to make a 2 storey tower. I then proceed to cut the four walls to make the tower. Out of the 4 walls, 1 of them will need to be shorter to allow for the opening below (marked 4 in sketch). The other 3 will be full height walls.


Next was to cut out 2 foam board boards for the insides where the dice would bounce off and finally the bottom ramp which was cut out of some cardboard I found lying around. 


Glue the “box like” structure to an art cardboard canvas base. I wanted the structure to look like some sort of silo, so I added some doors, made using corrugated cardboard (again you can get this from recycle pizza boxes or any stationary shop) 


I glued them to the sides using PVA glue. After that I added some cut out foam board to make an enclosure for the dice to land. I also decided to add some floor texture from a Japanese take away boxes which I have procured during lunch. The top broken roof of the tower was made out of corrugated board. 


The final touches were adding sand texture then base coating and paint.  

Give it a go! Scratch building is always fun and rewarding.

Capt. Stainguard